

I’m not really a fan of New Year resolutions, but this year as part of my #2018makenine list I am going to try to sew more patterns using independent pattern companies – especially those I have never tried before. The perfect opportunity to get this off and running is the January project from the #sewmystyle2018 challenge. Two birds with one stone and all that. For those who are unfamiliar with the #sewmystyle2018 sewing challenge I will link the website for Jessica who is organising it this year here and you can head on over to read all about it if you are interested. Basically it is pretty much a monthly sewing challenge which enables you to connect with the sewing community and have a bit of fun sewing up a different pattern each month.
The January pattern is The Sunny Dress/Top pattern from Friday Pattern Co.

It’s a reversible dress ( and by that I mean it can be worn with the scoop neckline at the front or back) for knit fabrics, with set in sleeves and a scalloped hemline. I don’t know very much about The Friday Pattern Co. but do like the fact that they support a rotating collection of the top-ranked charities in the world. For purchases of this pattern they donate 5% to The Against Malaria Foundation.
Originally I was all for making the dress just as it was with no planned alterations, but when it came to making it I decided that in all honesty I probably wouldn’t wear this body skimming shape so I decided to alter it to a design that would be more wearable to me. I was really pleased to read a post on Facebook (I think) that Jessica had written where she mentioned that this design was really a blank canvas that you could adjust in so many ways, and so I went for it!
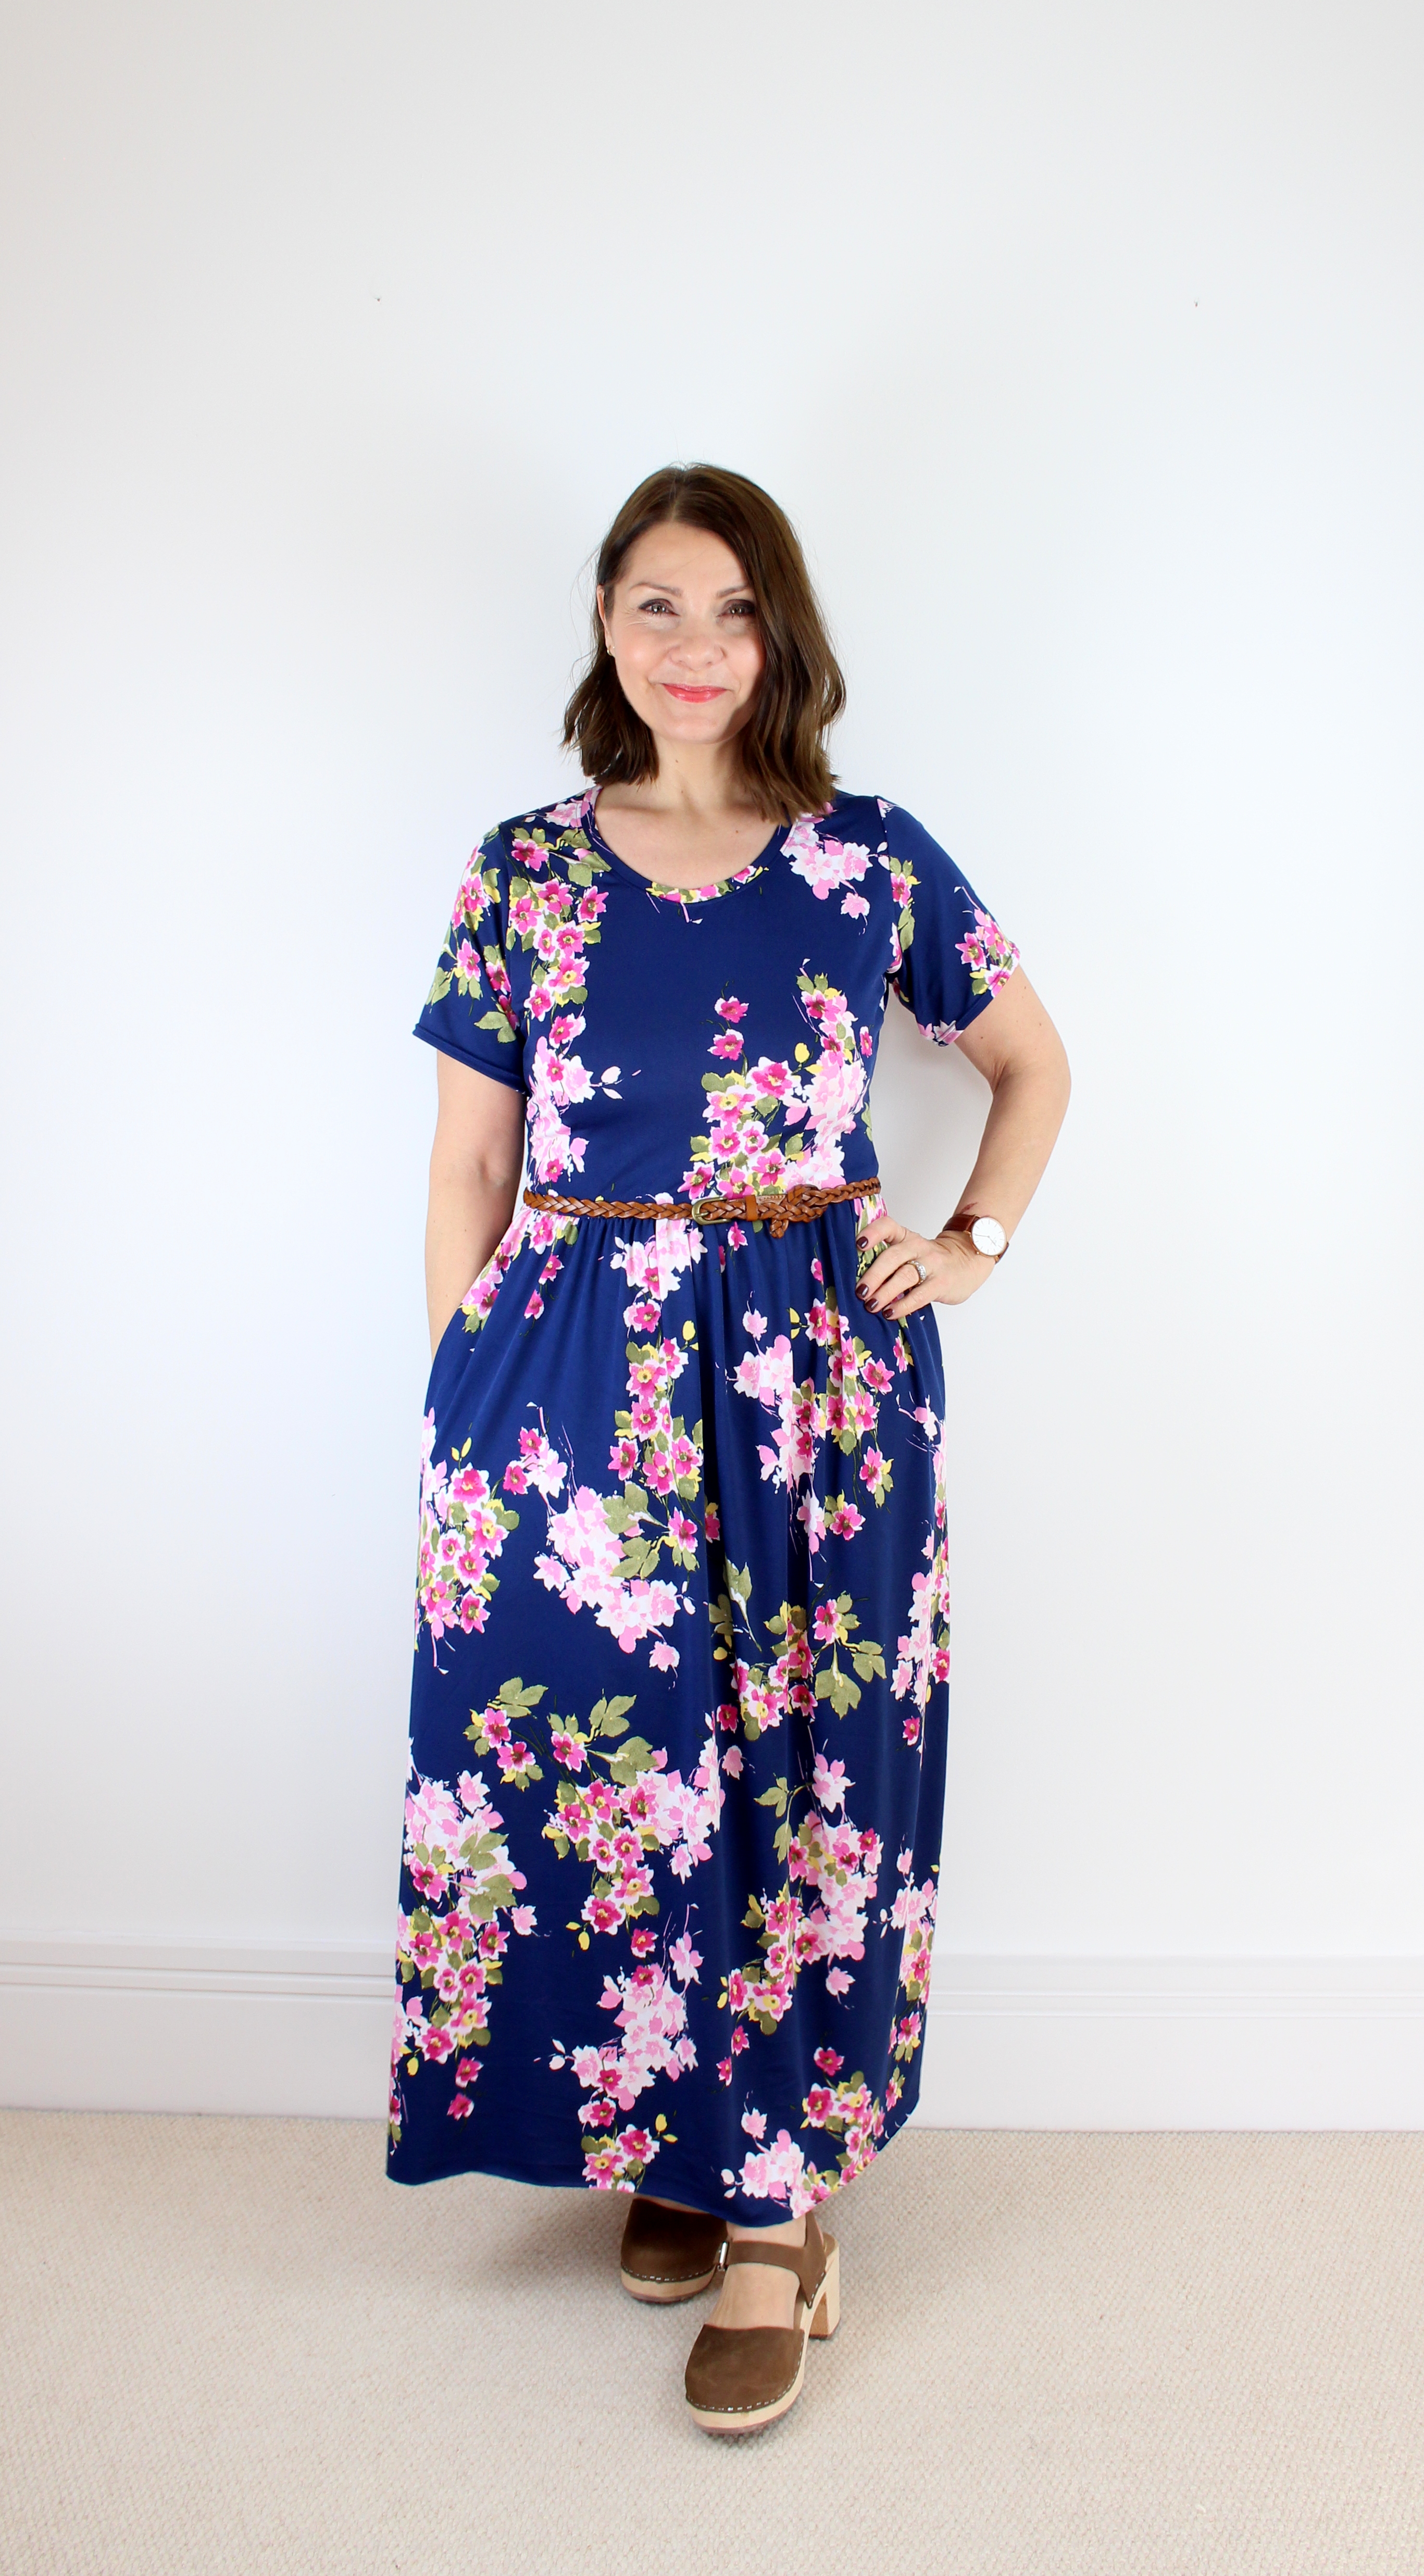
My fabric choice was a floral print stretch jersey from Minerva Crafts. It’s super pretty with a good stretch and a nice medium weight.
Before I started I had noticed comments from others that the dress seemed to come out a little on the small size, so although I probably am a size medium, I cut it to between a medium and large. I feel that this left it a little on the large size, and would stick to a medium if I were to make it again.
In my head I wanted to create a simple dress with a gathered skirt – rather like The Moneta Dress by Colette Patterns. In order to achieve this I cut the top version out (view B), but cut it straight across the bottom hem edge as I didn’t need the scalloped shaping.
The pattern is basic. No pattern markings such as notches were indicated, which was a little unusual, but not actually necessary, as it was a pretty straightforward shape to sew. The instructions are simple, but were perfectly adequate for what it was asking you to do. I decided to set my sleeves in to the bodice sleeve edge before sewing the side seams together to make a ‘tube’. This worked well and I simply sewed up my sleeves at the same time I sewed my side seams in one long seam. I must admit that I was disappointed by how loose the sleeves are and will certainly take in quite a bit next time. I shortened the length of the sleeves by 1″.

There are a couple of ways to finish the neckline. You can simply turn it under and stitch in place, or make a neckband which is my preferred method. The Friday Pattern Co. provides a link to a tutorial on how to do this if this is your first time doing so.
As my fabric was really quite stretchy I chose to make my neckband 20% smaller than my neckline opening, and this worked out just right.

O.K, when I got to this point it was time to decide how much I needed to take off the length of the bodice. To do this I simply tried it on and marked it. In my case I needed to take off 6.5″ from the bottom of the bodice. I also pinned my skirt pieces on roughly to see that they looked about right. This also gave me the opportunity to mark out on the skirt pieces where I wanted to place my in-seam pockets – let’s talk about the skirt and pockets…
So to make the skirt I simply used two rectangles of fabric that were left over after I had cut out the top. I didn’t calculate how wide/gathered I wanted it to be – it was simply going to be as gathered as the width of the fabric allowed! As I had a fair bit of length left I realised that it could possibly be long enough for a maxi dress – we’d have to see when it was finished. So I left the length as long as I could, as it could easily be shortened to knee length if necessary later on. Originally I was just going to sew my remaining fabric into a ‘loop’ which would make a skirt with a vertical seam down the back of the dress, but could not bring myself to make a skirt without in-seam pockets so needed to cut the remaining fabric into 2 rectangles to create a side seam either side that I could insert pockets into.
The pattern does not come with a pocket piece ( I would not expect it to with it being such a close fitting style), so as always I fell back on my trusty favourite pocket pattern template that I always use when adding my own in-seam pockets, which is from my Colette Peony dress – but any in-seam pocket pattern piece would do – I added them to each side seam of the ‘skirt’ at the point I had marked out earlier when trying on. Next it was time to gather the ‘skirt’. There are several ways to do this, but I chose to measure my waist, cut some clear elastic to that length, and stretch and sew it to the top of the skirt. This gathers the skirt evenly and it can then simply be stitched to the bodice.


So, some things to note if I try this again… The weight of the skirt when added, pulled down the bodice piece more than I expected it to, so if I were to make this alteration again, I would probably raise the waist by at least another inch (especially if the fabric has the same weight as this one).
As mentioned, the sleeves were far to wide , so these would be narrowed down next time. I would also cut a size medium as I didn’t find that it came out small on me as others had.
Also another thing to hold my hand up to is the unfinished nature of these photographs. I finished this dress the same morning that my husband was taking photos of a couple of other projects that I have made recently. I knew that he wouldn’t be available for another good few days to take photos of this dress, by the time this challenge would have been finished, so please excuse the hastily ironed neckline, the complete lack of sleeve hem ironing (that twin needling is crying out for a good press), and the fact that the skirt hem is unfinished because I wanted to leave it on my dressform to hang for a couple of days. I’m pleased to say that it has dropped nicely now to a perfect floor length and my job this afternoon will be to finally hem it.
All in all I am super pleased with the outcome. I didn’t imagine it turning into a maxi dress originally, but that is the wonderful thing about sewing that you can do just whatever you like.
Thank you to Jessica and all her team of assistants for putting this challenge together – do head on over to social media and search #sewmystyle2018 for tons more inspiration on this dress pattern and the project in general. Thank you also to the Friday Pattern Company for generously giving all participants of this challenge a discount code for their pattern purchase.
Take care and I’ll be back soon,
Kathy x

I think it looks gorgeous! The hacks worked very well. Pockets are, of course, a nessecity!
Thank you, I agree – pockets are essential! X
Your dress is so well-made and looks great on you. The changes you made really worked.
Thank you very much! I enjoyed making it x
Your dress is gorgeous, love the long length.
Thank you! A bit of a happy accident – I just had enough fabric to make it work in a maxi length, and fortunately after leaving it to hang, it has now dropped to a perfect floor length x
Wow!!!!!! This is such a wonderful dress
Thank you! x